Keeping the grout on your shower walls clean is essential to maintaining the best possible state for your bathroom.
Grout deterioration over time can result in leaks, unsightly gaps and even mould growth. Luckily, regrouting your shower is an easy way to give it a new lease on life and shield your tiles from harm. With the help of this tutorial, you will be able to ensure that your bathroom maintains its aesthetic appeal while also being useful.
Understanding Grout and Regrouting
What is Grout?
Grout is a dense fluid used to fill the gaps between tiles, securing them in place and preventing water from seeping behind them. It serves as a barrier against moisture, which can cause serious harm if ignored, and is an essential part of bathroom tiling. Grout can deteriorate with time and require replacing, and that’s when you call tile regrouting specialists to upgrade the look and feel of your bathroom, kitchen and other tiled areas.
Signs Your Shower Wall Needs Regrouting
Grout that is crumbling or cracked, discoloured grout or mould that refuses to go away even after frequent washing are telltale signs that your grout is failing.
Ignorance of these concerns might result in more serious ones, such as water damage to your bathroom’s substructure. When you see specific indicators of wear and tear, you have to reglue.
Tools and Materials Required
Below are some tools and materials needed for regrouting a shower wall:
List of Essential Tools
- Grout saw or multi-tool: This is used for removing old grout efficiently.
- Grout float: This is used to apply new grout evenly.
- Sponge: This is used for cleaning excess grout from tiles.
- Bucket: This is used for mixing grout and holding water.
- Scrub brush: This is used for cleaning the tiles and grout lines before starting.
Materials Needed
- New grout: Depending on your tiles, you may need sanded or unsanded grout. Sanded grout is typically used for wider gaps, while unsanded is better for narrower joints.
This is used for removing old grout efficiently. - Grout sealer: This is needed to protect the new grout from moisture and staining.
- Grout cleaner: This helps to prepare the surface before regrouting.
- Bucket: This is used for mixing grout and holding water.
- Caulk: This is needed for sealing the edges where the shower walls meet the floor or ceiling.
Preparing the Shower Wall
Safety Precautions
Wear safety eyewear and protective gloves before you start. You should take care not to breathe in any dust or particles that may be created during the removal of old grout.
Cleaning the Area
Cleaning the shower walls completely should come first. Scrub away any surface grime, soap scum, or mould with a grout cleaner. This guarantees that the freshly applied grout will correctly cling to the tiles.
Removing Old Grout
Carefully remove the old grout from between the tiles using a grout saw or multi-tool. Use caution so as not to break or harm the tiles.
Creating spotless, empty joints so that fresh grout may be added is the aim. In order to ensure a good regrouting job, take your time with this step.
Age
Mixing the Grout
To mix the proper amount of grout, go to the packaging directions. The consistency of the grout should be silky and similar to peanut butter. It will not set correctly if it is too runny, and it will be challenging to work with if it is too thick.
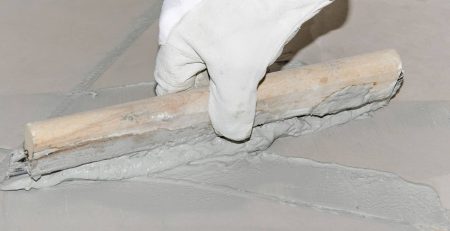
Applying the Grout
Apply the grout to the tiles at a 45-degree angle using a grout float. This facilitates the grout’s successful insertion into the joints.
To guarantee uniform coverage, work in small parts. Using a moist sponge, remove any extra grout as you proceed, being careful not to remove grout from the joints.
Finishing Touches
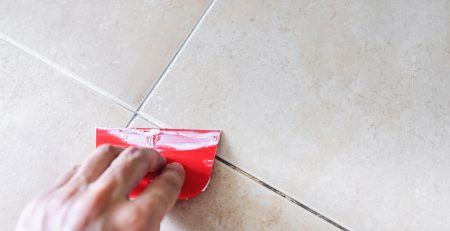
Cleaning Excess Grout
Once the grout has been applied, let it cure for fifteen to thirty minutes. Then, use a slightly moist sponge to wipe away any leftover grout haze from the tiles. Use of excessive water should be avoided as this may remove the grout from the joints.
Sealing the Grout
It’s time to apply a grout sealer when the grout has dried, which normally takes 24 to 48 hours.
Sealing prolongs the life of your regrouting job by shielding the grout from moisture, mould and stains. Just apply the grout sealer evenly throughout the grout lines by following the directions on the package.
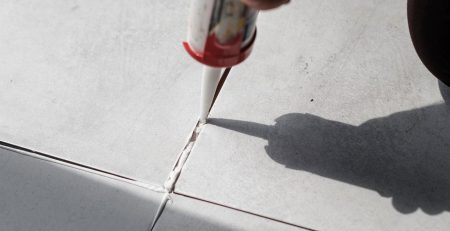
Caulking the Edges
First things first, you need to figure out whether your tiles are suitable for regrouting or not. If you have ceramic tiles, porcelain or stone tiles, you can proceed to select the type of grout and colour to fill in your tiles.
Post-Regrouting Care and Maintenance
Curing Time
It’s crucial to give the grout time to cure completely before taking a shower. This usually entails holding off on using water in the freshly regrouted shower for at least 48 to 72 hours. This curing time makes sure the grout sets correctly and holds up over time.
Routine Maintenance
Cleaning your grout on a regular basis is crucial to keeping it looking excellent. To stop the growth of mould and mildew, use a gentle grout cleanser; stay away from strong chemicals that can damage the grout.
This little upkeep will keep your shower looking new and prolong the life of your bathroom faucets.
Benefits of Trusting a Professional Tile Regrouting Company Near You
Regrouting a shower wall is a practical DIY project that can significantly improve the appearance and functionality of your bathroom. It’s crucial to recognise, though, that regrouting can be a laborious and meticulous process, especially for individuals who have never done it before.
To get long-lasting effects, the procedure includes carefully removing the old grout, applying the new grout precisely, and sealing it properly. Although doing your own regrouting can be rewarding, it can also result in hazards like incorrect sealing, which could cause leaks and additional damage.
For those looking to avoid the hassles and ensure a professional finish, hiring a specialised tile repair service in Sydney is a wise investment. Expert regrouting services provide you peace of mind that your shower walls are being handled and sealed with skill, in addition to saving time. In order to guarantee that your tiles are firmly in place and that your bathroom is shielded from water damage, our skilled crew in Sydney provides complete bathroom regrouting services.
It’s time to think about hiring a professional grout repair service if you’re suffering with recurring problems like broken grout, mould growth or leaking showers. For consultation and assistance in getting your bathroom back to its best state, get in touch with us right now.
Avoid waiting until a minor problem necessitates an expensive fix. For professional regrouting services and to maintain your bathroom in exquisite shape for years to come, get in touch with our Sydney tile repair specialists. Contact us today and get a free custom quote!